Thursday, April 21, 2011

Adventures with Yeast - Challah


For some reason, despite my apprehension and nervousness approaching the making of a yeast bread, I was convinced that my first attempt at making challah would be perfect, that it would be delicious and flawless. I guess that sometimes optimism is just overconfidence. My results weren’t bad, particularly the second loaf, which was actually quite delicious, but I’m still not completely satisfied and will definitely be making some (rather substantial) tweaks the next time I bake challah, which will hopefully be soon, as my mind is still occupied with thoughts of flour, yeast, and honey.


I had been dying to bake bread all week. It’s almost the end of the semester here and so of course I’m completely stressed out of my mind, because that’s apparently just the way I do things. I knew that working in the kitchen would just melt the stress away, and I was right. Kneading the bread felt therapeutic. The repetitive motion and the satisfaction of seeing the dough coming into shape between my hands did wonders for my mood – and probably my blood pressure too. The tantalizingly delicious smell of baking bread filling my apartment didn’t hurt either.


I did a search of the internet and somewhat randomly chose this recipe. I wanted to bake one loaf that night and the other the next day so my boyfriend could have fresh bread right out of the oven when he came over. I had chosen to make challah for him after all. To make this work, I separated the dough into two parts just before the first rising. I let one rise normally to bake that night, and I stuck the other in the fridge to slow the rising overnight. It worked perfectly. I just took the bowl out in the morning, let it warm, and proceeded from there to the shaping and second rising of the dough.


My first loaf turned out disappointingly dark with a crust that was just too thick and dark. It was okay, and straight out of the oven it was delicious. There’s quite a bit that can be forgiven when bread is at the stage where it’s almost too hot to eat and I ended up eating nearly half the loaf by myself for my dinner that night, for the most part discarding the too-thick crust.

My first attempt. Note the thick crust.

 Because my first loaf turned out darker and with a thicker crust than I wanted I reduced the oven temp to 340° from 375° and set my timer for 30 minutes for the second loaf, eventually taking it out around 35/40 minutes. I was determined to make this work. I also used an egg-white wash on the outside instead of an egg-yolk one like I did on the first. To be honest, I’m still not entirely sure where the motivation came from for that one.


 This loaf turned out much better. No thick crust this time! I found it to be particularly tasty when ripped into chunks rather than sliced. There’s something very satisfying about just grabbing a large hunk of bread and eating it. Despite this improvement, I didn’t feel like I had achieved what I had hoped for when setting out.


A big part of my dissatisfaction with my results is that earlier in the day I had a piece of the absolute best challah I’ve ever eaten. It was sweet and tender, with the perfect flavor of delicate honey. It was one of those things that once you eat it, you become obsessed with and must have again. It is my mission to recreate that bread.

Overall, this was a good place to start, but you’ll see me back soon with my own version, to see if I can get closer to that elusive ideal.

The second loaf straight out of the oven

Sunday, April 17, 2011

Love Letter to a Rainbow

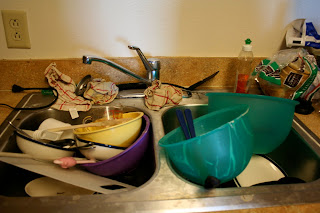
I'd just like to say that I love these bowls. 


The bright colors add a much-needed splash of color to my dull apartment kitchen, particularly in the winter, which I had thought we had finally escaped here in Buffalo, but today it snowed again. Go figure. I'm a girl who loves color, and these bowls are perfect for that extra little punch of brightness. Plus their nesting conserves a lot of space while offering me plenty of options. This is important when sharing a small kitchen with three roommates. They were a christmas present from my mother. She knows me so well. 


Now to go clean them up out of the sink...

Thursday, April 14, 2011

Apple-Banana Bread with Chocolate Chips

Sometimes I buy bananas that I have no intention of eating. Sometimes, I hide bananas in the corner of my counter until they’re brown and disgusting and my roommates think I’m crazy. The reason for this? Banana bread. Delicious, easy-peasy banana bread. Usually, my fruit turning brown isn’t something I get excited about. When these bananas began to brown though, all I could think of was banana bread. I wanted to make it now. Unfortunately, I’m in college and I have all these pesky classes getting in the way of my food obsessions. I had to keep putting it off, and these bananas got positively terrifyingly disgustingly deliciously brown. I’m sparing you a picture, because trust me, they were scary, and I don’t want to give you nightmares.   
           This recipe is adapted from this banana bread recipe from Simply Recipes, which is usually my go-to recipe for basic banana bread.  This time though, I decided to switch it up a bit, mostly because I was craving chocolate. To be honest though, when am I not craving chocolate? (answer: never)


            I haven't done too much experimenting when it comes to baking, so I was slightly nervous, but everyone who ate it (including me, who had more slices than is strictly healthy) declared it to be a resounding success. I love it when that happens. Half of why I love cooking and baking is creating something delicious for my friends and family. It’s an incredibly satisfying feeling that gives me all sorts of warm fuzzies inside. (And now I have an image of me with a stomach full of these. Good job Ruth. Good job.)
I tried to get an essay done while this was baking in the oven, but I kept being distracted by the delicious smell of baking banana bread. Let’s just say I didn’t get it finished that night.


These are my changes to the original recipe:

  • I only had two bananas so I cut up a medium apple and threw it in. I used an empire apple because that’s what I had on hand, but I can see any kind, or even two different kinds being equally delicious
  • I initially added a ½ cup of chocolate chips, but then the chocolate craving part of my brain (all of it) decided there should be more, so I sprinkled in a few more for good measure
  • I set my kitchen timer for 35 minutes because I’m paranoid about dry banana bread (which counts as a tragedy on the Shakespearean scale in my book) and I’m impatient and sometimes I like to pretend that my food will be done sooner if I set the timer accordingly. I checked it with a knife right in the center every five or so minutes and it was all done probably sometime around 50 minutes or so. (Sorry about the lack of a definite baking time. I’d go with 45 minutes as a guide for checking, but be prepared for the baking time to stretch to up to an hour)
  • I added some cinnamon and nutmeg because I had it on hand (for once, despite being broke and spices being so darn expensive) and I always love the flavors in my banana bread. I didn’t measure (sorry! I really need to get better at this), just sprinkled some in while mixing. Feel free to leave these out if you’re not so keen on the flavors.

Quality Control

Ingredients:
  • 2 overripe brown bananas (mushed)
  • 1 medium apple, peeled and cut into pieces
  • 1/3 cup melted butter
  • 1 cup sugar
  • 1 egg (lightly beaten)
  • 1 tsp. vanilla
  •  cinnamon and nutmeg (to preference)
  • 1 tsp. baking soda
  •  pinch of salt
  • 1 ½ cups all purpose flour
  • ½ cup chocolate chips (or a bit more if it strikes your fancy)

Directions:
  • Preheat oven to 350°F
  • Mush up the bananas in a large mixing bowl. Mix in the melted butter. Add sugar, beaten egg, vanilla, cinnamon and nutmeg. Sprinkle baking soda and salt over the top. Mix in. Add flour and mix. Stir the chocolate chips and apple bits into the mixture at this point. Pour into a buttered or sprayed loaf pan. 
  • Bake 45 minutes to 1 hour. Remove from loaf pan and cool on a rack. Slice, serve, enjoy, and share(or keep it all for yourself. I’m not judging.)


A Day of Baking


The two results of a day of baking.

   One Delicious:

Apple-Banana Bread and Rhubarb Cheesecake Squares
Yummmmmm

   The other not so much.


I promise I cleaned up as soon as I finished. I do have a dishwasher after all. (Okay, maybe after I had a slice of the banana bread. Just being honest here. Don't pretend you wouldn't do the same thing. There were chocolate chips in it!)


Sunday, April 3, 2011

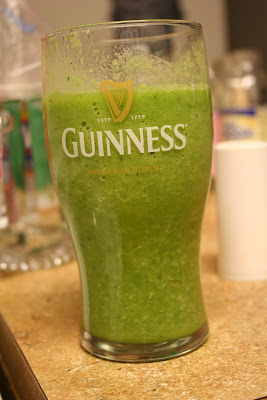
Green Monster in a Guinness Glass

Earlier this year I discovered Green Monsters, delicious fruit smoothies turned bright green by blending in veggies. My veggie of choice: baby spinach. It sounds awful, but they're absolutely delicious. You don't taste the veggies at all. Just the yummy yummy fruit. I was running low on baby spinach this time, so it's a bit lighter green than usual. I usually just throw in whatever I have in the fridge/freezer or whatever I feel like. This particular green monster has:
  • 1/2 frozen apple
  • 1/2 frozen banana
  • handful of baby spinach
  • what was left of the Del Monte peach fruit cup in the fridge
  • lemonade (and a bit of iced tea)
  • a few ice cubes
Blended into smooth deliciousness and poured into a Guinness glass. 


I first used lemonade one day because I was out of my almond milk, and I loved the way it turned out. Sometimes if I remember to make it and put it into the fridge the night before I'll throw in a cup of iced tea for a little wake-up. I particularly like chai tea with the frozen bananas. 

Plus, it's fun to freak people out with the bright green color!